
Explore Sustainable Art Practices and Techniques
Crayons to Clay:
Collaborative Sculpture Project

Project Steps:
Oven-Bake Clay
Project Steps:
Air-Dry Clay
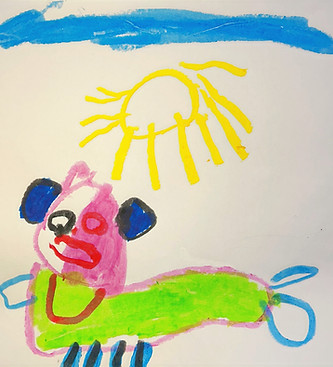
Step 1: Sketch
-
Create at least two pencil sketches of possible sculpture designs based on your kindergarten student’s drawing.
-
Include notes on color, form, and details you will want to highlight.
Step 2: Build the Skeleton
-
Use wire and foil to build the skeleton (armature) for your sculpture.
-
Make sure your skeleton is strong and can stand on its own.
-
This is the “bones” of your sculpture—it needs to support the clay that will go on top.
Step 3: Apply the Clay
-
Use oven-bake clay to cover your wire and foil skeleton.
-
Work in small batches, gently pressing the clay onto the skeleton until it’s fully covered.
-
Use sculpting tools to add texture and detail.
Step 4: Baking
-
Measure the thickness of your sculpture to calculate baking time:
-
15 minutes per 1/4 inch of clay
-
-
Holmes will confirm your baking time with you.
-
Once finished, sculptures will be baked by the teacher.
Step 5: Prime and Paint
-
After baking, prime your sculpture with a white coat of acrylic paint.
-
Paint your sculpture to stay true to the kindergarten student’s original design.
-
Add details and color carefully for the best finish.
Step 6: Seal
-
Once the paint is fully dry, apply several coats of spray Mod Podge to seal and protect your sculpture.
Final Step: Art Beat
-
On October 23, your sculpture will be displayed next to your kindergarten partner’s drawing during the Art Beat: Ecos de Pasado event.
-
You will meet your partner and showcase your collaborative work to the community.
Step 1: Sketch Ideas
• Look at your kindergarten partner’s drawing of their “new animal.”
• Create at least two pencil sketches of how you want to sculpt it.
Step 2: Build a Skeleton (Armature)
• Use wire and foil to build a simple skeleton of your animal.
• This helps your sculpture stay strong and light.
• Keep it small (about 5–6 inches tall max).
Step 3: Add Clay
• Press Magic Mud clay over your foil skeleton in thin layers (no more than ½ inch thick).
• Score and slip: scratch the surface and add a little water when attaching new pieces.
• Use your fingers or clay tools to shape details.
• Dip fingers in water to smooth cracks as you work.
Step 4: Drying
• Place your sculpture on cardboard or a wire rack (not plastic).
• Let it air dry for 48–72 hours. Rotate it sometimes so it dries evenly.
• Do not rush drying with fans or heaters—it can crack.
Step 5: Sand & Seal
• Once dry, gently sand rough edges with fine sandpaper.
• Paint a thin coat of gesso or Mod Podge to seal the surface before painting.
Step 6: Paint & Finish
• Use acrylic paints to bring your animal to life.
• Add patterns, textures, and colors that match the drawing.
• Once painted, add a final clear sealer (Mod Podge or acrylic spray) to protect it.
Step 7: Display!
• Your sculpture will be shown next to your kindergarten partner’s drawing at Art Beat – Ecos de Pasado.
• Be ready to meet your partner and talk about how you transformed their drawing into 3D art!
Resources
-
Examples from prior years will be shown in class and linked on this page.
-
Watch the YouTube playlist (see videos below) we created with Crescent Elementary and KCSOS to see the process from past projects.