
Positive & Negative Space Project
- Madison Holmes
- Oct 21, 2025
- 2 min read

Updated: Nov 5, 2025
Introduction to the Element of Art: Space
Space in art refers to the distance or area between, around, above, below, or within objects. It helps artists create depth, perspective, and relationships between shapes and forms.
“In a drawing, space refers to the work’s two-dimensional surface area, or picture plane. Because the picture plane is two-dimensional, perspective systems allow artists to mimic how we see and create spatial relationships.”— Discovering Drawing, 3rd Edition by Sallye Maha-Cox
According to Wikipedia, space is “the perspective (distance between and around) and proportion (size) between shapes and objects and how their relationship with the foreground or background is perceived.”
Key Terms
Positive Space – The area containing the subject.
Negative Space – The empty area surrounding or between the subject(s).
Open Space – Empty areas in 3D art (like a sculpture).
Closed Space – Filled or solid forms in 3D art.
Step 1: Learn
Watch the short video below to visually understand how artists use space to create balance, contrast, and depth.
Then complete your sketchbook notes on Space.

Bonus: Add color to your notes for *extra credit!
Negative / Positive Space Practice
Materials Needed
(1) Black paper — 1 x 2 inches
(1) White paper — 1 x 2 inches
Pencil
White colored pencil
Scissors
Tape
Steps
On the black paper, outline your scissors handle using a white colored pencil.
Fill in the negative space around the handle.
On the white paper, outline the scissors handle with a pencil.
Add value and detail to make the scissors look realistic.
Cut both papers in half and tape them together to see how positive and negative space interact.

Imagine
Materials Needed
You
Your Thoughts
Your Table Partners
Steps
Review the Project Guidelines in the Make section below.
Spend 5 minutes brainstorming what you want your project to look like.
Share your idea with your table partners.
Give and receive feedback — ask questions and refine your concept together.
Plan
Materials Needed
Chromebook
Space Project Plan
Pencil
Steps
Research images or references that inspire your design. Add them to your notes section and include image links or citations.
List the seven types of space in your notes and explain how you plan to use each one in your composition.
Create a thumbnail sketch of your project that demonstrates the use of all seven space techniques.
Make
Materials Needed
Space Project Plan
White paper
Pencil & eraser
Ruler
Micron pen
Paintbrush
Ink
Directions:
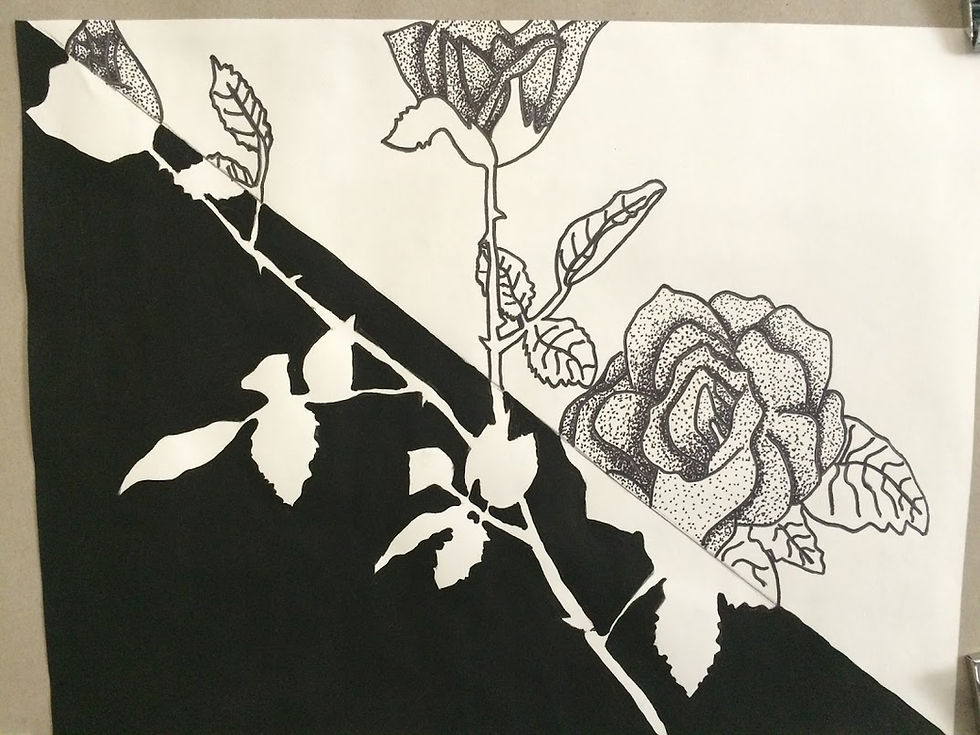
On the paper provided, using a pencil, divide the paper from the top left corner to the bottom right corner.
In the spaces created, fill one side with negative space showing your plant's silhouette. On the opposite side show space by using details and value.
The 5 types of techniques: size, overlapping, placement, detail, color. (see examples)
Once done with the directions above, check out a fine-line pen and india ink. Trace, add value to your art then fill in the negative portion of the silhouette . Erase pencil once ink is dry. Bonus - Add some extra value with the charcoal.
Write your name in pencil on the back!


Comments